A&P muscle lab Record muscle activity with EMG
Compare muscle electrical activity while holding two light loads.
Use Human SpikerBox to record biceps activity. Keep the same arm position, compare six trials and explain how muscles stay active during a static hold. Student worksheet and teacher key included.
Plan your muscle lab
Plan one class
About 60 minutes, with a 75–90-minute college option. Pacing is a planning estimate; run the setup once on your classroom device.
Work in groups of three
One volunteer, one recorder and one timekeeper. Everyone predicts, graphs and explains. Wearing electrodes is always optional.
Leave with evidence
Six saved recordings, a table of RMS measurements, a comparison graph and a claim that matches the data—not a prescribed result.
Everything for this lesson
For high-school A&P, health science and introductory college A&P. Students should know that motor neurons activate muscle fibers and be able to read graph axes and calculate a mean. No coding or previous electrophysiology lab is required.
- Students will: Distinguish joint movement from muscle electrical activity; measure RMS over equal time windows; compare repeated trials within one person; explain one result and one limitation.
Follow the investigation
1. Make a prediction
Hold your forearm level, palm up, as if carrying a small tray. Your elbow is not moving. Does that mean your biceps is inactive? Now imagine holding a little more weight without changing the angle.
Investigate two related questions: Does the muscle signal differ between supported rest and a steady hold? Does adding a light external load change the signal during that hold?
On a phone, scroll the table sideways to see every column.
| Condition | What you do | What it helps you test |
|---|---|---|
| Rest baseline | Forearm and bottle fully supported on the table. Relax the arm. | What the recording looks like before each hold. |
| A · lighter load | Hold an empty plastic bottle, forearm unsupported, elbow about 90°. | Electrical activity while maintaining the position. |
| B · added load | Hold an identical bottle containing 250 mL of water in the same position. | Whether the signal changes with a greater external load. |
Write a prediction for rest versus hold and for B versus A. Include a physiological reason. The arm and empty bottle already have weight: A is a lighter-load condition, not “zero load.” Use smaller comfortable loads if needed and record the change.
2. Set up one recording station
- Recording equipment Human SpikerBox with battery, one orange electrode cable, three fresh patch electrodes, a USB data cable, a laptop or Chromebook, and Spike Recorder. The kit supplies the recording hardware; the computer is separate.
- Classroom supplies Two identical light plastic bottles, water and a way to measure 250 mL; a chair and table; a timer; the student worksheet; and supplies for cleaning shared equipment according to school procedures.
- Before class Use Chrome or Edge on a supported computer, or Chrome on Chromebook, for this USB workflow. School-managed devices must permit serial-device access. Native mobile setups differ; rehearse those separately.
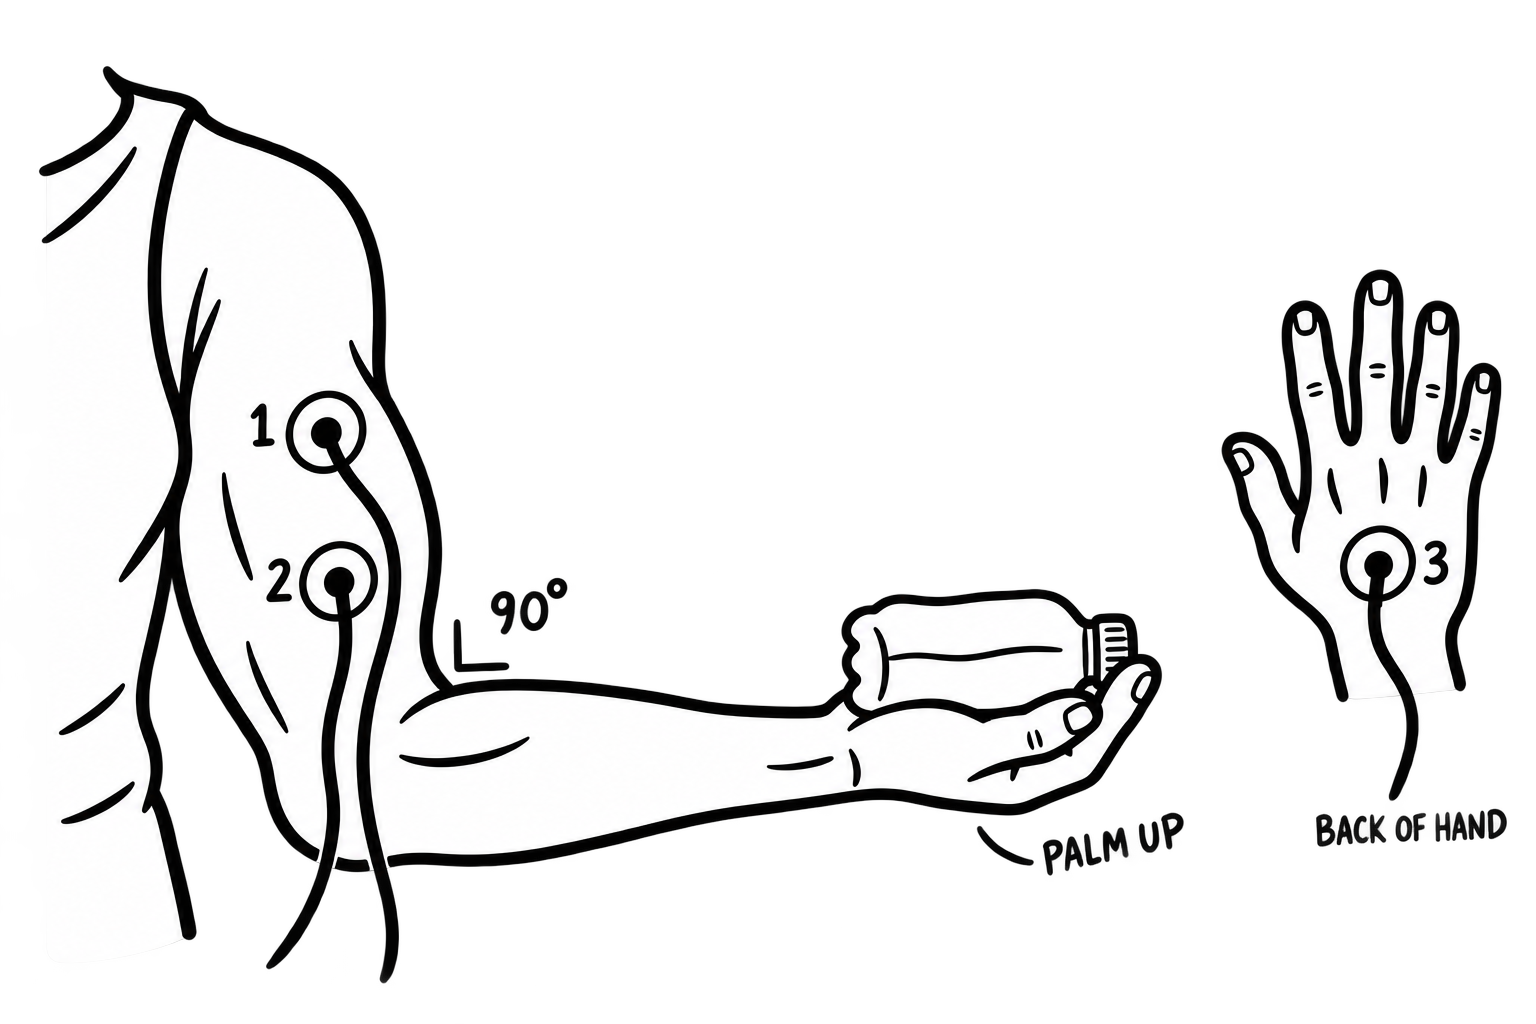
- Find the muscle and place the patches. Gently bend the elbow to find the biceps at the front of the upper arm, then relax. Apply two patches along the muscle belly, away from the elbow crease. Clip one red lead to each. Put the third patch on the back of the hand and connect the black reference lead.
- Connect the hardware. Plug the orange cable into one Human SpikerBox channel. Install the battery, turn the black dial until it clicks, and connect the USB data cable to the computer. Support the cable so it cannot tug on the patches.
- Connect in the current app. Open spikerecorder.backyardbrains.com/app/. Choose SpikerBox → Connect and select the device’s serial port if prompted. In SpikerBox → Channels, enable the connected channel. Use Configure channels in that panel to select the channel and EMG preparation if available, then confirm the configuration. Keep the channel and filter settings unchanged across trials.
- Check before recording. With the arm supported, inspect the baseline. Gently hold the empty bottle with the forearm clear of the table: look for a responding signal. Adjust the display so the trace is readable and not cut off. Then test Record → Stop → save → File → reopen on a short practice recording.
Participation and comfort
Use intact, unbroken skin and comfortable, brief holds. No maximum effort, exercise-to-exhaustion or electrical stimulation is part of this lesson. Stop for discomfort. Non-wearers can operate the recorder and analyze shared volunteer data. If no recording is available, use the clearly labeled practice-data activity below; it assesses analysis, not recording skill.
3. Record six trials
Sit upright with the upper arm close to the torso, shoulder relaxed, elbow about 90°, palm up and wrist neutral. Use the same arm, grip position and bottle shape throughout. During each hold, the forearm and bottle must be clear of the table; the support must not carry the load.
Record six separate trials in this order: A1, B1, B2, A2, A3, B3. This spreads the two conditions across the session. Keep the patches attached. The timekeeper calls the cues while the recorder starts the file and notes any movement or connection problem.
| Time in file | Participant | Recorder / timekeeper |
|---|---|---|
| 0–5 s | Relax with forearm and bottle fully supported. | Start Record and the timer together. Call “rest.” |
| 5–8 s | Move into the hold position. | Call “lift”; allow the arm to settle. |
| 8–13 s | Hold still at about 90°, forearm unsupported. | Call “hold”; note any movement, cable tug or posture change. |
| 13–25 s | Return the forearm and bottle to support; relax. | Call “rest,” then Stop at 25 s. Allow longer rest if needed. |
Finish the save dialog after each trial. Use a group code and condition, such as G2-A1.nwb; do not put student names in filenames. Reopen the first saved file to confirm it contains the rest and hold. Use SpikerBox → Connect to return to live recording, then continue the sequence. Keep rejected files with an “invalid” suffix and give each repeat a new filename so nothing is overwritten.
Keep a record of imperfect trials
If the connection drops, the signal has flat clipped tops, or the arm/patch/cable moves during the planned measurement window, mark that trial invalid and explain why. Retain it, rest, and repeat the whole trial with the same condition. Do not discard a clean trial because B is lower than A.
4. Measure each recording
RMS (root mean square) summarizes the magnitude of an electrical signal over a selected interval. It is useful here because the raw EMG swings above and below its baseline; simply averaging signed voltages can cancel much of the signal.
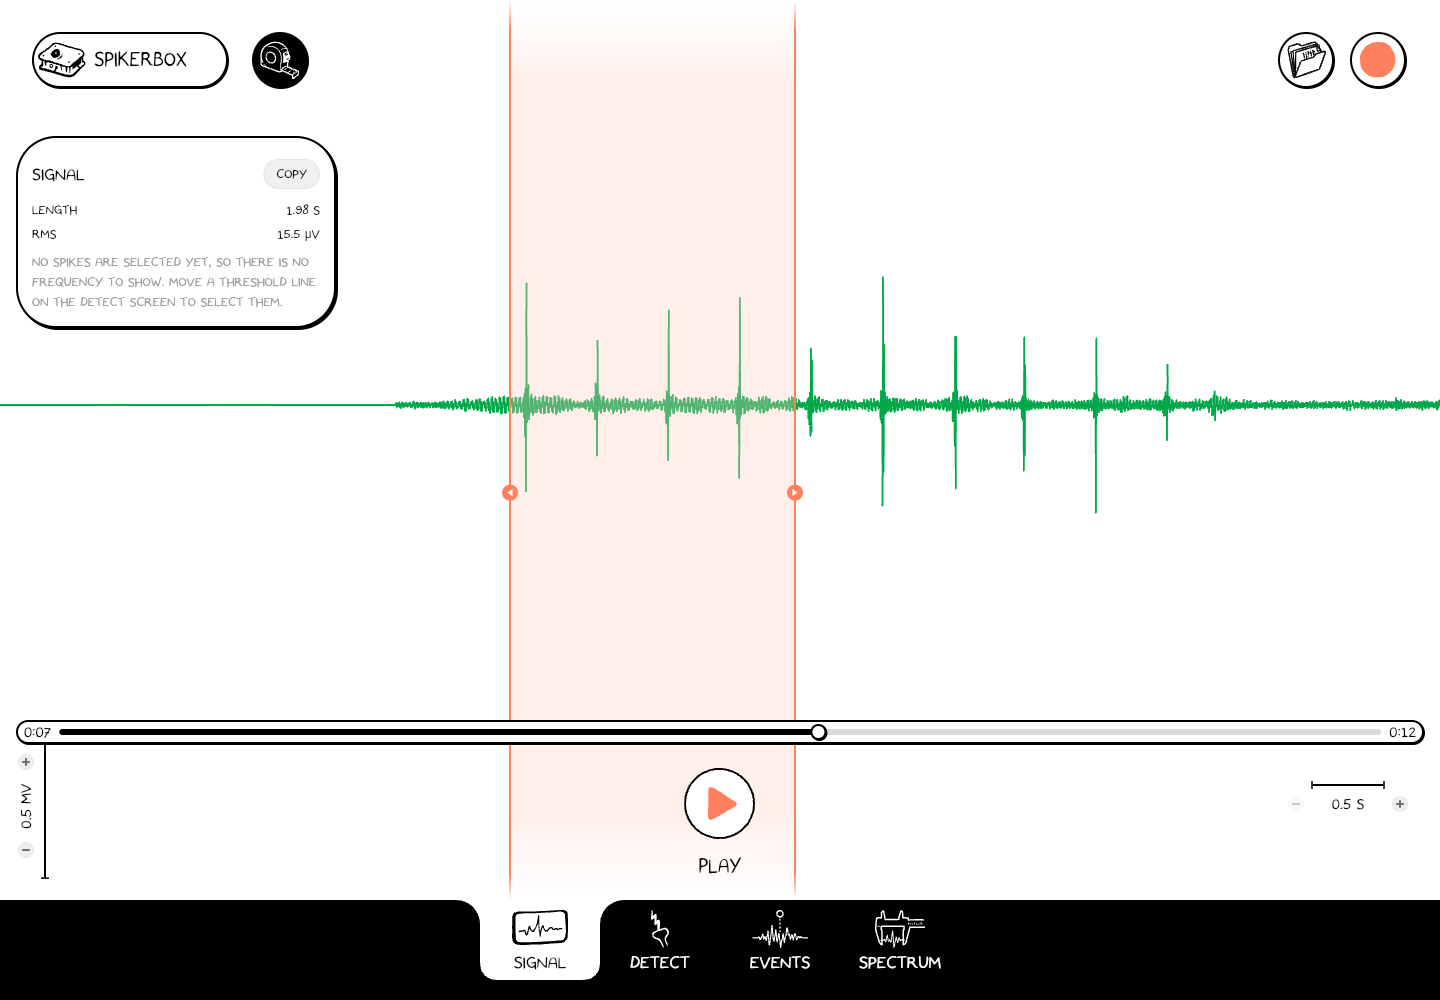
- Open and pause. Choose File, open a saved trial and pause in Signal. Find the rest and steady-hold intervals using the time axis and your trial notes.
- Measure supported rest. Select Measure (the tape-measure icon) and drag from 1 to 4 seconds. Check that Length is about 3.00 seconds. Record the RMS value and the unit shown by the app.
- Measure the steady hold. Select from 9 to 12 seconds: three seconds inside the steady hold, after the lift. Record RMS in the same unit. Repeat both measurements for all six valid files.
- Keep the comparison fair. Use the same window lengths, channel and settings. If a cue was missed so the planned window contains movement, repeat the trial; do not search the trace for a preferred result. Save one screenshot showing the selected interval, axes and RMS panel.
5. Graph and explain your results
Record the group code, arm, bottle fill, electrode placement, channel, filter settings and RMS unit on your worksheet. The same unit must be used throughout. “RMS” is the measurement; µV or mV is its unit.
On a phone, scroll the table sideways to see every column.
| Trial / file | Rest RMS · 1–4 s | Hold RMS · 9–12 s | Valid? / observations |
|---|---|---|---|
| A1 | ________ | ________ | ________________ |
| B1 | ________ | ________ | ________________ |
| B2 | ________ | ________ | ________________ |
| A2 | ________ | ________ | ________________ |
| A3 | ________ | ________ | ________________ |
| B3 | ________ | ________ | ________________ |
- Graph the data. Put bottle condition A and B on the horizontal axis and hold RMS, with its unit, on the vertical axis. Plot all three valid hold values in each condition. Add the mean for A and for B; keep the individual values visible.
- Answer with numbers. Compare rest with hold. Then calculate mean(B) − mean(A) for hold RMS. Describe the direction and the spread across repeats. Does the evidence support each prediction? A small, reversed or inconsistent difference is an acceptable result.
- Explain the physiology. Explain how a muscle can be electrically active while the elbow remains still. Draw motor neuron → neuromuscular junction → muscle fibers, and show where the surface electrodes record.
- State what you cannot conclude. Name one possible artifact or uncontrolled variable. Explain why the graph cannot tell you how strong a classmate is, how many motor units fired, or the force produced by the biceps. Suggest one change that would improve the investigation.
Your hand-in
Submit the completed table, one annotated measurement screenshot, the graph, your pathway drawing and a short claim–evidence–reasoning paragraph. If working only with practice data, identify that source and replace the screenshot with a description of the specified measurement windows.
Practice the analysis before recording
These numbers are an invented teaching example, not a human recording, expected values or evidence of device performance. Use them to rehearse graphing and interpretation, or to complete an analysis-only activity when no volunteer recording is available. They cannot teach electrode placement or verify signal quality.
| Trial | Rest RMS | Hold RMS | Trial note |
|---|---|---|---|
| A1 | 7 | 35 | No logged issue |
| B1 | 8 | 52 | No logged issue |
| B2 | 8 | 44 | No logged issue |
| A2 | 7 | 38 | No logged issue |
| A3 | 9 | 41 | No logged issue |
| B3 | 8 | 48 | No logged issue |
| B2-invalid | 8 | 110 | Cable tug during 9–12 s; repeated as B2 above |
Use the six valid rows. Calculate the two hold means, graph the individual points and decide what the comparison supports. Explain why the invalid row is excluded, and why a clean low value must remain in the dataset.
Teacher guide: run the class
This is a newly authored A&P lesson built on BYB’s human EMG activities and current Spike Recorder workflow. The worksheet, analysis and key are supplied; the exact bottle protocol and pacing have not yet been classroom validated. Treat the times as planning estimates.
| Minutes | Teaching task |
|---|---|
| 0–5 | Ask how holding a load changes muscle activity; students write predictions. |
| 5–10 | Introduce EMG, RMS and group roles. Review voluntary participation. |
| 10–20 | Place electrodes; connect; test record, save and reopen. |
| 20–30 | Collect and save the six trials; log and repeat invalid trials. |
| 30–45 | Measure 12 windows, complete the table and graph. |
| 45–55 | Discuss the results; complete the explanation and exit question. |
| 55–60 | Remove and discard patches, clean shared equipment and return supplies. |
- First-use preparation Allow roughly 30–45 minutes to rehearse one complete station, plus time for device permissions and preparing the class set. Confirm a visible signal, successful save/reopen and the Measure/RMS panel on the actual classroom computer.
- For a 45-minute period Preconnect a demonstration station. Use one shared volunteer recording or the practice data for analysis, or split acquisition and analysis across two meetings. Do not compress six novice setups and 12 measurements into an unsupported short-lab promise.
- One station or a class set One volunteer recording can serve a whole-class analysis lesson. For station work, use groups of three or four; rotate recorder and analyst roles without requiring everyone to wear electrodes. Each new volunteer needs three fresh patches.
- For students who do not wear electrodes Offer the same analysis questions using a shared volunteer’s deidentified recording. With no usable recording, use the synthetic table and assess the analysis objectives only. Give equal credit for sound analysis; do not grade willingness to wear electrodes.
If the trace is not usable
No device: check power, a data-capable cable, SpikerBox → Connect and the browser’s serial permission. No response: check the selected channel, red-lead patch contacts and black reference. Noise or movement spikes: settle the arm and support loose cables. Flat clipped tops: stop, correct the setup and repeat; changing the display scale does not repair clipped data. Preserve the original observations.
Teacher answer key and assessment
- Practice calculations A hold mean = (35 + 38 + 41) / 3 = 38 µV. B hold mean = (52 + 44 + 48) / 3 = 48 µV. Difference B − A = 10 µV. A ranges 35–41 µV; B ranges 44–52 µV. Rest values are 7–9 µV.
- A defensible example conclusion “In these invented data, all holds have greater RMS than supported rest, and the mean is 10 µV higher with the added load. This is consistent with greater recorded muscle activity during these holds. It does not measure biceps force or establish the response of other people.”
- Why a still arm can have an EMG During an isometric hold, muscle tension helps balance the external load without visible change in joint angle. Motor neurons activate muscle fibers at neuromuscular junctions. Surface electrodes detect summed muscle electrical activity through the skin, not a recording of the motor neuron itself.
- Why the added load may change RMS Greater demand can involve changes in motor-unit recruitment and firing rate. Surface RMS also depends on placement, tissue, geometry and cancellation. This experiment does not separate those mechanisms or measure force. A clean B ≤ A result should prompt discussion, not deletion.
- Why reject the example invalid trial The logged cable tug overlaps the preselected window. That is a measurement-quality reason decided independently of the size of the result. Excluding the value merely because 110 is high would not be a sufficient rule.
On a phone, scroll the table sideways to see every column.
| Criterion | 2 points | 1 point | 0 points |
|---|---|---|---|
| Record and document | Conditions, units and trial decisions are traceable. | One important detail is missing. | Values cannot be traced to conditions. |
| Compare | All valid points, correct means and labeled graph. | Minor calculation or labeling error. | No valid comparison. |
| Explain | Links isometric activity, motor pathway and measured signal. | Partly correct link. | Confuses EMG with neuron recording or movement alone. |
| Use evidence | Claim cites numbers and acknowledges inconsistent results. | Claim is partly supported. | Conclusion ignores the observations. |
| Evaluate | Specific artifact/limit and a useful improvement. | Names a limit without explaining it. | Unsupported force, health or strength claim. |
For analysis-only work, the first criterion assesses accurate transcription and source labeling; it does not certify acquisition skills. Exit question: “A classmate says twice the RMS means twice the muscle force. What extra measurement and evidence would you need?” Look for an independent external-force or torque measurement under controlled conditions to test an EMG–task-force relationship. Estimating isolated biceps force also needs biomechanical assumptions about moment arms and other active muscles.
College extension: examine the paired changes
Allow 75–90 minutes total as a planning estimate. Add a within-participant analysis of matched A/B pairs: A1 with B1, A2 with B2, A3 with B3. In every pair calculate B − A, even when B was recorded first.
| Pair | A hold · µV | B hold · µV | B − A · µV |
|---|---|---|---|
| 1 | 35 | 52 | 17 |
| 2 | 38 | 44 | 6 |
| 3 | 41 | 48 | 7 |
- Plot each paired change, report the mean difference (10 µV) and range (6–17 µV), and discuss repeatability. These are three pairs from one participant, not three independent people.
- Explain why supported rest is a baseline/quality check, while B-versus-A hold RMS is the primary load comparison. Do not divide by a small rest value to claim an activation percentage.
- Identify order effects, posture drift and electrode cross-talk. Half the groups may use BAABBA rather than ABBAAB to distribute starting condition; keep within-person results separate.
- Explain why RMS alone cannot distinguish motor-unit recruitment from rate coding. Design an extension with an independent force measurement if force is the learning goal.
- Distinguish the observed static hold from isotonic contraction. Connect both to muscle tension, external load and joint movement; the static recording alone does not demonstrate every contraction type.
Sources and further help
The biceps placement is adapted from BYB’s paired-muscle EMG activity. The six-trial bottle comparison, worksheet and assessment are new teaching materials. Software instructions were checked against the current Spike Recorder guide on October 15, 2026. The broader Foundations of Neuroscience curriculum informed the inquiry sequence; this page does not promise access to the full developing curriculum.
- BYB paired-muscle experiment: biceps/triceps placement and muscle roles
- Current Spike Recorder: connect by USB, including Chromebook permissions
- Current Spike Recorder: configure channels, preparation and filters
- Current Spike Recorder: select a time window and read RMS
- Current Spike Recorder: find and move saved NWB files
Keep exploring
High-school A&P
Fit this investigation into your muscular-system unit and connect it to nervous-system signaling.
High-school A&PCollege A&P
Review course fit, assessment and the laboratory setup your department needs.
College A&PChoose your equipment
Check the recording kit, current price and availability before you plan your class.
View Human SpikerBox